White model data beautification process——UE exports PBR material and loads it on the 3D client
Usage scenarios
How to quickly create beautification effects in batches in the SuperMap product system based on architectural vector surface data, and load them on the 3D client?
This document introduces data processing, material associated files, and client loading. The products involved include: SuperMap iDesktop, client
Production Process
a. Data processing
1. Raw data preparation
The original data is building vector surface data. The attribute table needs to have attributes related to the building height or the number of floors, so that it can be stretched into a model based on this attribute later. In the example, the attribute value in Height is used.
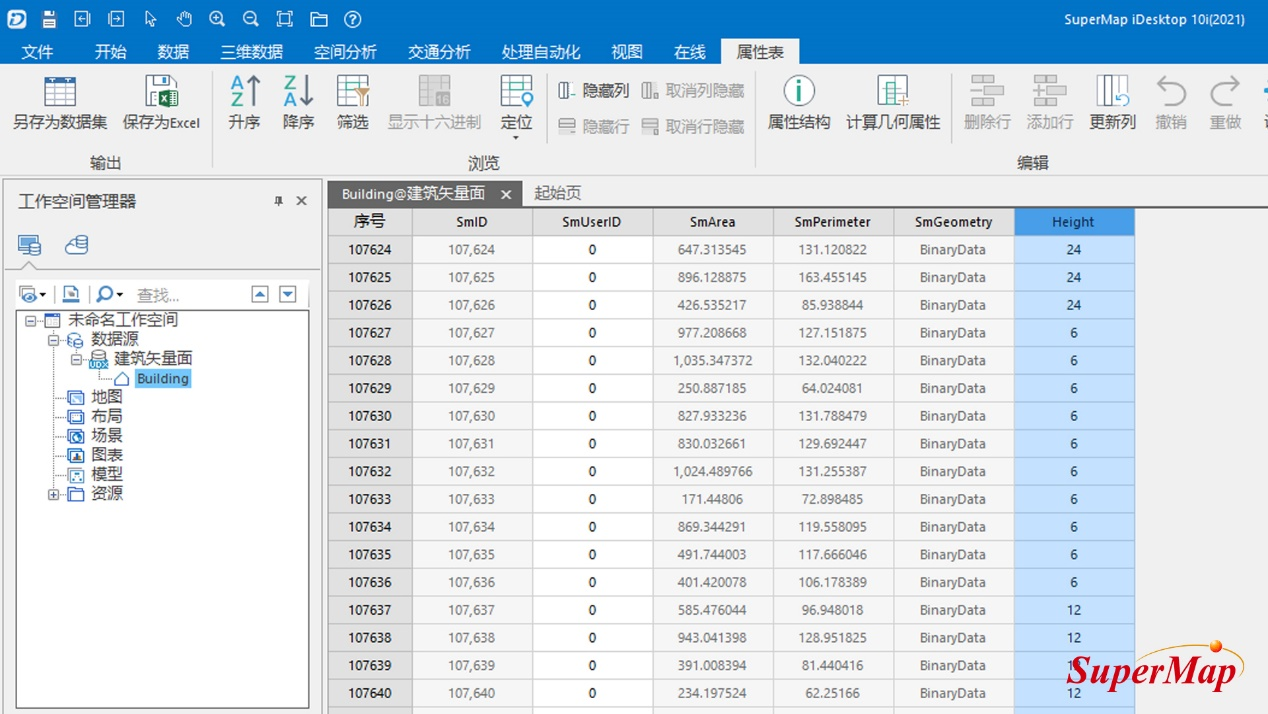
Figure 1
2. Material preparation
We provide 11 types of material materials for setting the appearance of the white mold. Users in need can contact us, and users can also use their own material materials.

Figure 2
3. Vector surface data attribute processing
Open the property panel of the surface dataset, and add two text-type properties of "side material" and "top material" in its properties;

Figure 3
We need to set the material type we want to be given to each model object in the attribute table:
- ①No distinction is made on the material of the top surface, and it is uniformly set to "TOPMat" by updating the column;
- ②Here, according to the Height attribute of the building vector surface, the building vector surface is divided into 11 intervals, different height intervals, different material types are set, and the corresponding material names "CityBuiMat1"-"CityBuiMat11" are filled in the properties In the table,
for example, for a building of 0-6m, set the side material to "CityBuiMat1"; for a building of 6-12m, set the side material to "CityBuiMat2"....
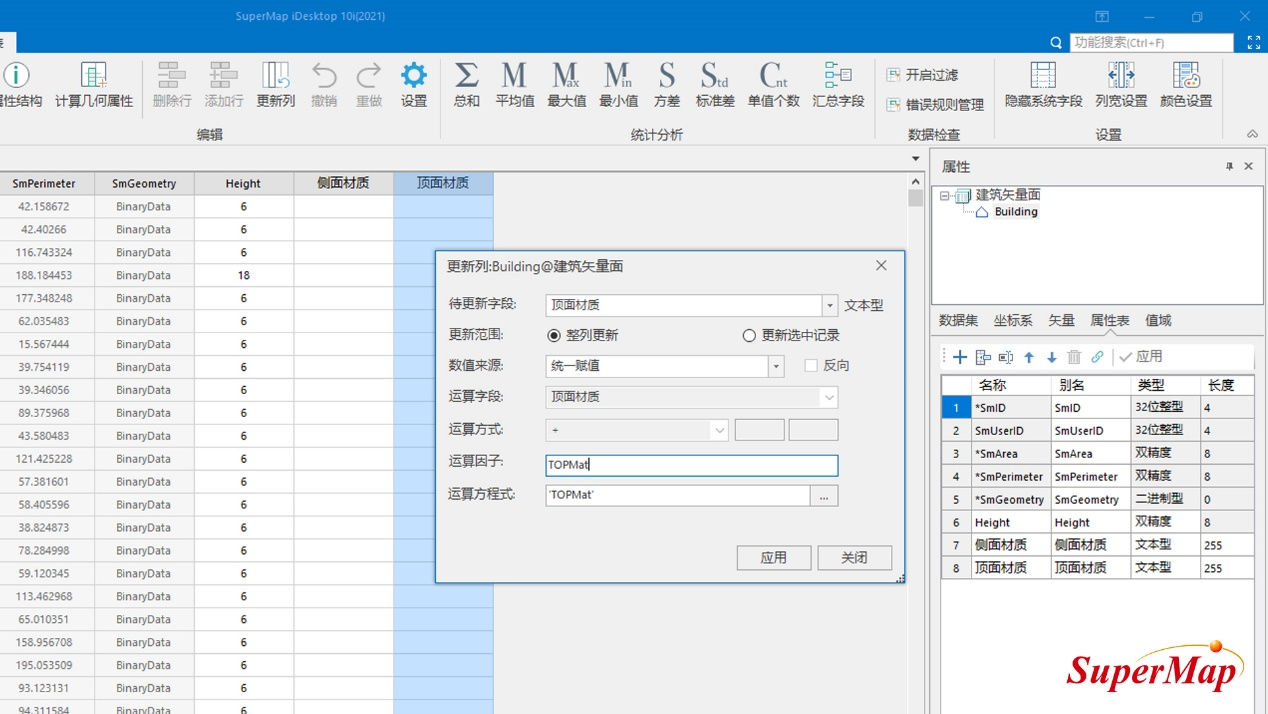
Figure 4
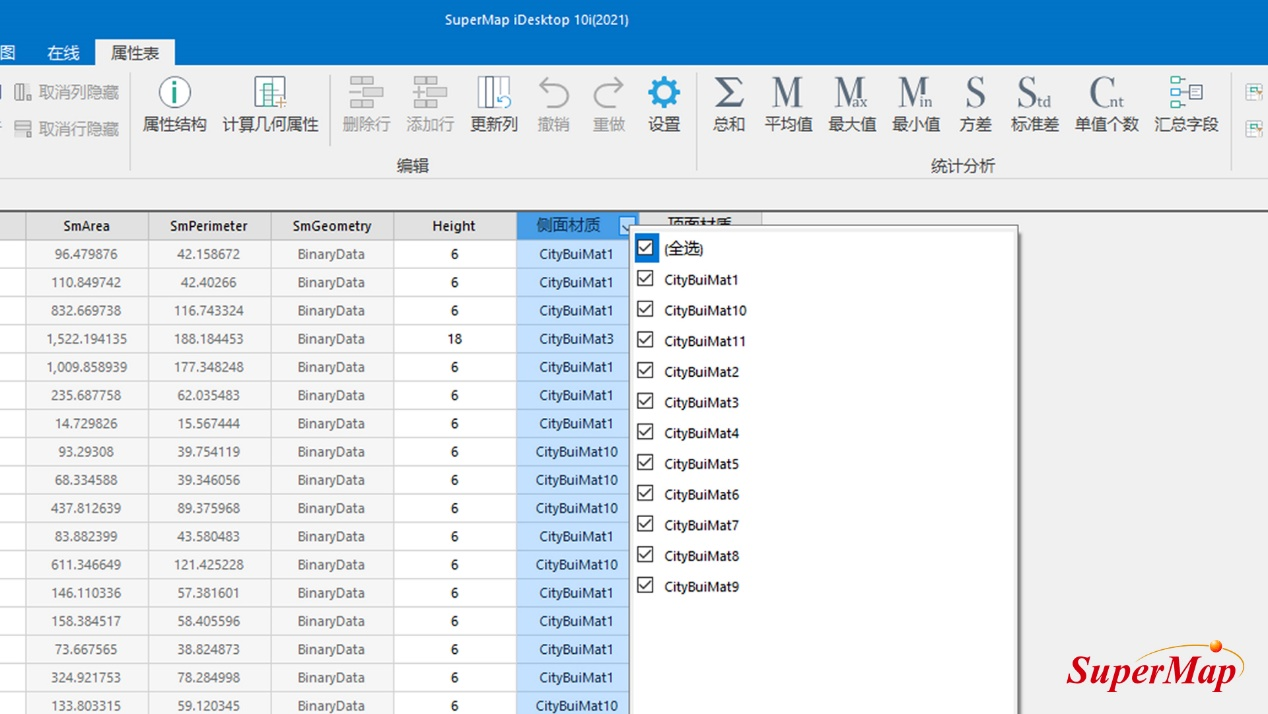
Figure 5
The final result is as follows:

Figure 6
4. Generate S3M cache
Select the "3D data-generate cache-generate model cache by surface extrusion" function, and in the pop-up panel, select the architectural vector surface dataset.
Parameter setting: Specify the path to generate the cache; the stretch height is set to "Height"; the tile side length is set according to the data range, here is set to "6000" because it is the data of the entire city;
Material settings: First, you need to check the material mode, select "true size" for the texture mode; select "top material" and "side material" for the texture field respectively; if you use the UE material material provided by us, the UV settings here "30" is more appropriate;
After the setting is complete, click Generate to get the S3M cache data.
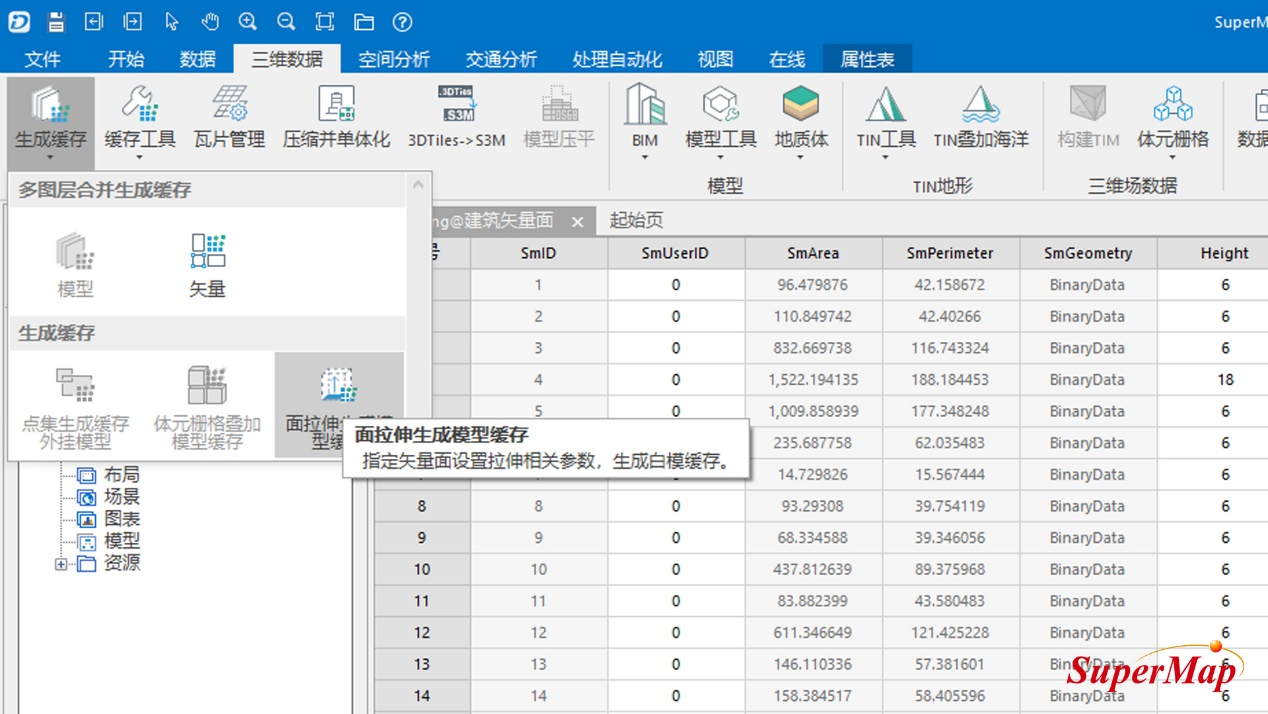
Figure 7
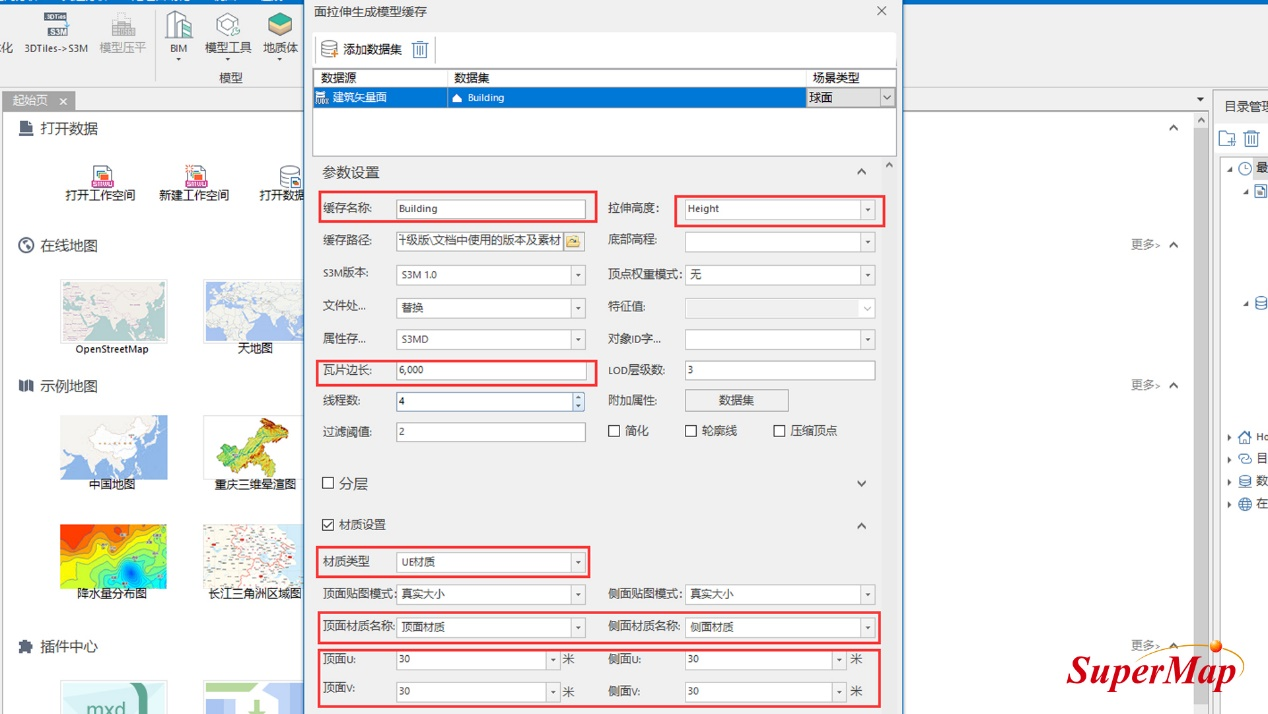
Figure 8
b. Material association file
1. Manually modify the following files
- ①Put the material folder into the newly generated cache folder, open the LayerInfo.json file in the material file, and change "LayerName": "xxxxx" to the name of the cache, such as "LayerName": " Building" and save the file.
In "Materials", the association relationship of materials is given by default, and the material name after "AssociateMaterial" is the material in UE; the material name after "OriginalMaterial" is the material name of S3M cache data, which is used in data processing In the third step, set the property values of the top material and side material.
Note: If you are using the material material provided by us, you do not need to modify the material name after "AssociateMaterial".
- ②Open the SCP file in the cache folder, add the material file name and LayerInfo.json storage path "AssociateMaterialUrl":"./MaterialPackage/LayerInfo.json"},"
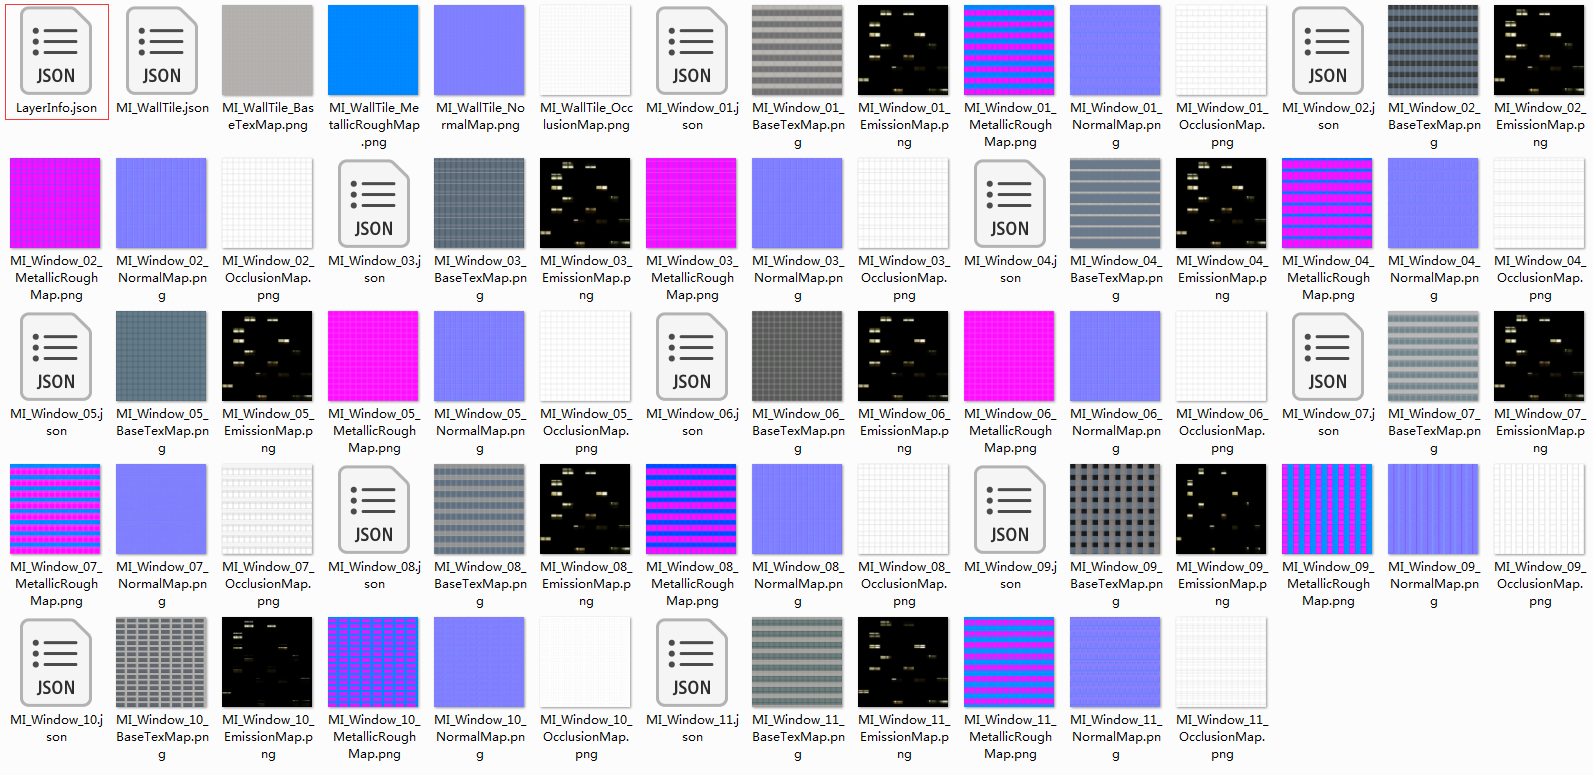
Figure 9
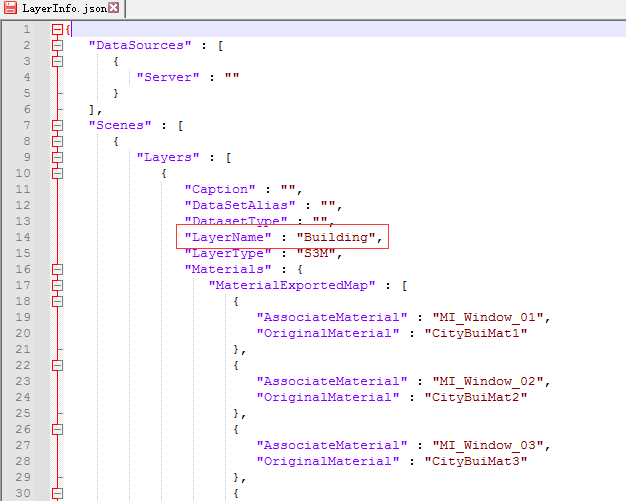
Figure 10
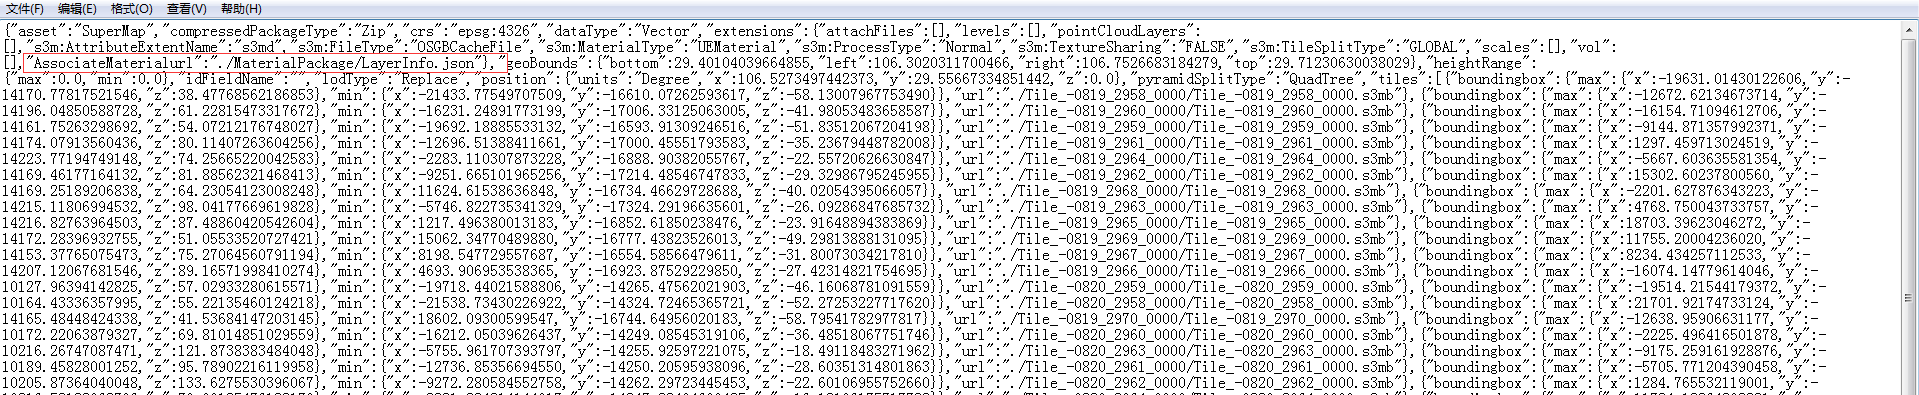
Figure 10-1
c, client loading
1. Release 3D services
In the previous steps, we generated the cache data of the white mold, put the material file, and then published the 3D service of the cache of the white mold, and loaded it on the client. The specific steps are as follows:
- ①In the "Workspace Manager" of SuperMap iDesktop desktop product, right-click "New Spherical Scene" under "Scene".
- ②Select "Normal Layer" under "Layer Manager", right-click "Add 3D Slice Cache Layer", and select the *.scp file generated in the previous step.
- ③ After adding the cache layer, save the scene and workspace, which will be used to publish the 3D service of the workspace type.
- ④After saving the workspace, click the "startup.bat" batch file in the %SuperMap iServer_HOME%/bin directory to start the SuperMap iServer service.
- ⑤ Open the browser, enter http://localhost:8090/iserver/manager in the address bar to enter the "Service Management" page, and click the "Quickly publish a service or a group of services" button under the "Homepage".
- ⑥The "Quick Publishing Service-Select Published Data Source" dialog box pops up, select "Workspace" in the "Data Source" field, and click "Next".
- ⑦The "Quick Publish Service-Configuration Data" dialog box pops up, click the "Remote Browse" button to select the previously saved workspace, and click "Next".
- ⑧The dialog box "Quick Publishing Service-Select Published Service Type" pops up, check "REST-3D Service", and click "Next".
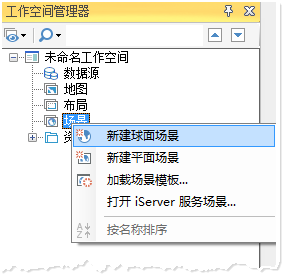
Figure 11
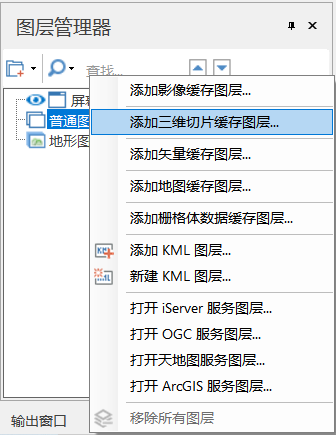
Figure 12
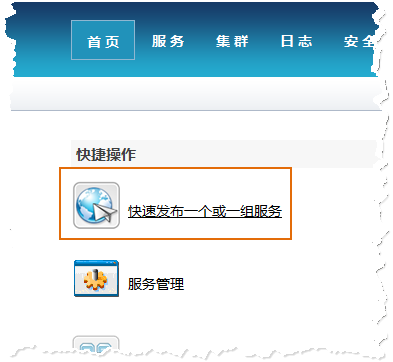
Figure 13
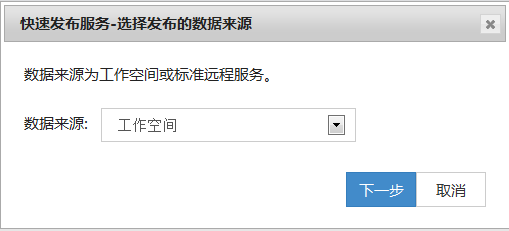
Figure 14
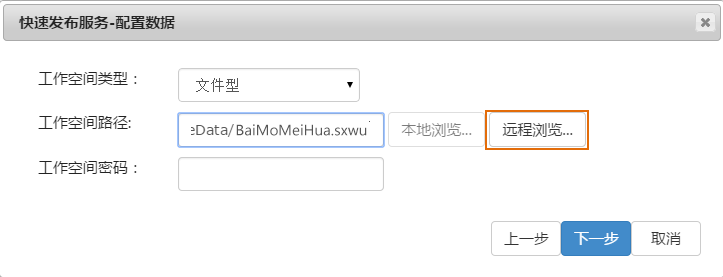
Figure 15
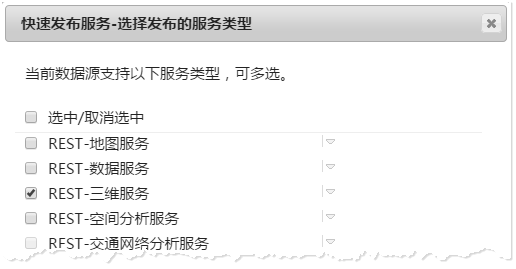
Figure 16
2. Client browsing data
After publishing the 3D service, you can browse the data through the client in this step.
- ①Get the 3D data url address, click in the following order
Acquisition: Enter the service list page (http://localhost:8090/iserver/services), find and click the 3D service published in the previous step;
Enter the "root directory" page, click "realspace"; copy the entire address. As follows: "http://localhost:8090/iserver/services/3D-BaiMoMeiHua/rest/realspace"
- ② Enter the WebGL product package, under the "examples" folder, open the "White-box_Beautification_for_Cityview.html" example in text mode. (The example includes day and night beautification effects, mainly distinguished by the brightness of the window view) First create the daytime effect, first find the daytime scene address
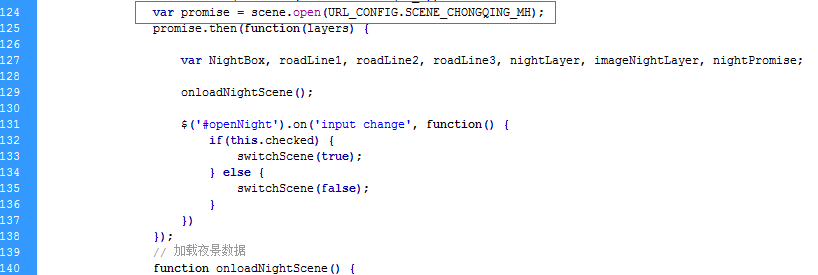
Figure 17
Change to: var promise = scene.open('http://localhost:8090/iserver/services/3D-BaiMoMeiHua/rest/realspace');
- ③If you need to make night effects, please copy a copy of the material and cache data, name the SCP file of the cache data "Building_1", and also set the "LayerName" in the LayerInfo.json file in the material file: "xxxxx ", change the name of the cache, such as "LayerName" : "Building_1", and save the file.
- ④ Open all the material files used in the form of text, take MI_Window_01.json as an example, increase the value of emissiveFactor, the window view will be more obvious (0-0.1 is usually used during the day), save the json file after modification .
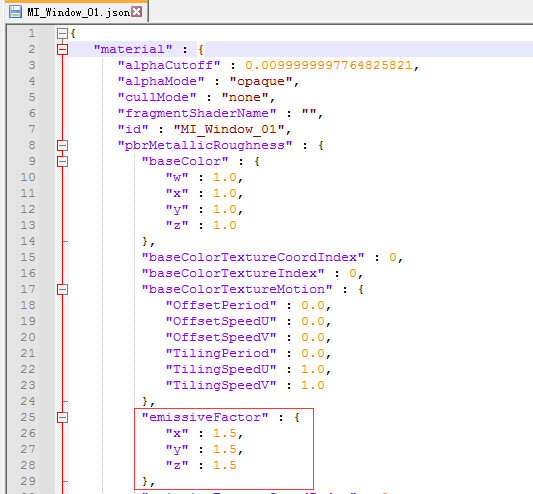
Figure 18
- ⑤Refer to the "publish 3D service" step, publish the newly copied night data to the service, and obtain the service address. Find the scene address of the night scene in the example and change it to: var promise = scene.open('http://localhost:8090/iserver/services/3D-BaiMoMeiHua_N/rest/realspace');
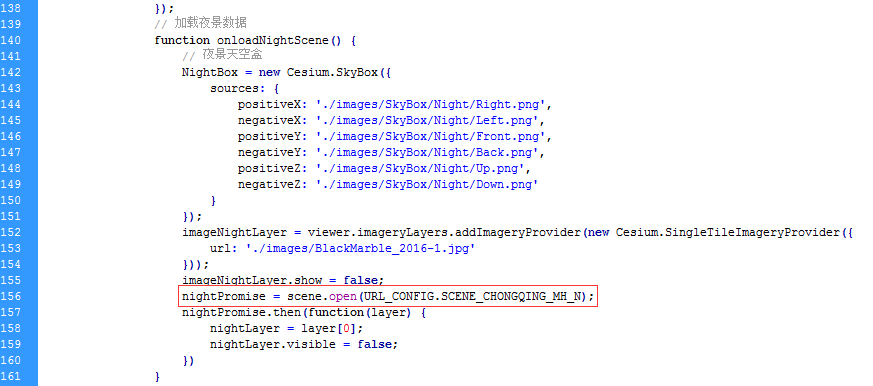
Figure 19
- ⑥After modifying the service address, run the example, and you can see the following similar scene effects.
Daytime effect
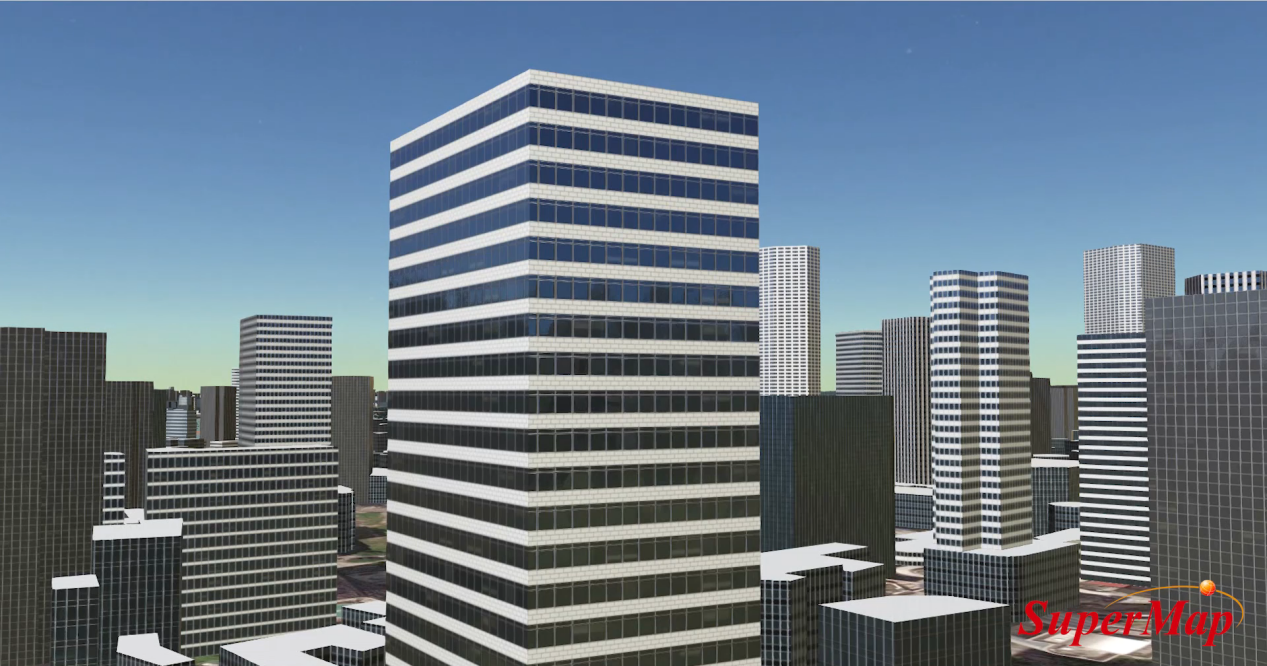
Figure 20
If you want to adjust the lightness and darkness of the material, you can modify the values of the metallicFactor and roughnessFactor parameters. When the roughnessFactor value is equal to 0, there will be no PBR effect, so it needs to be set greater than 0. You can also add the "intensityScale" parameter here to adjust.
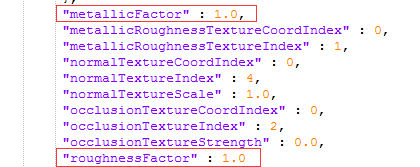
Figure 21
Evening scene effect
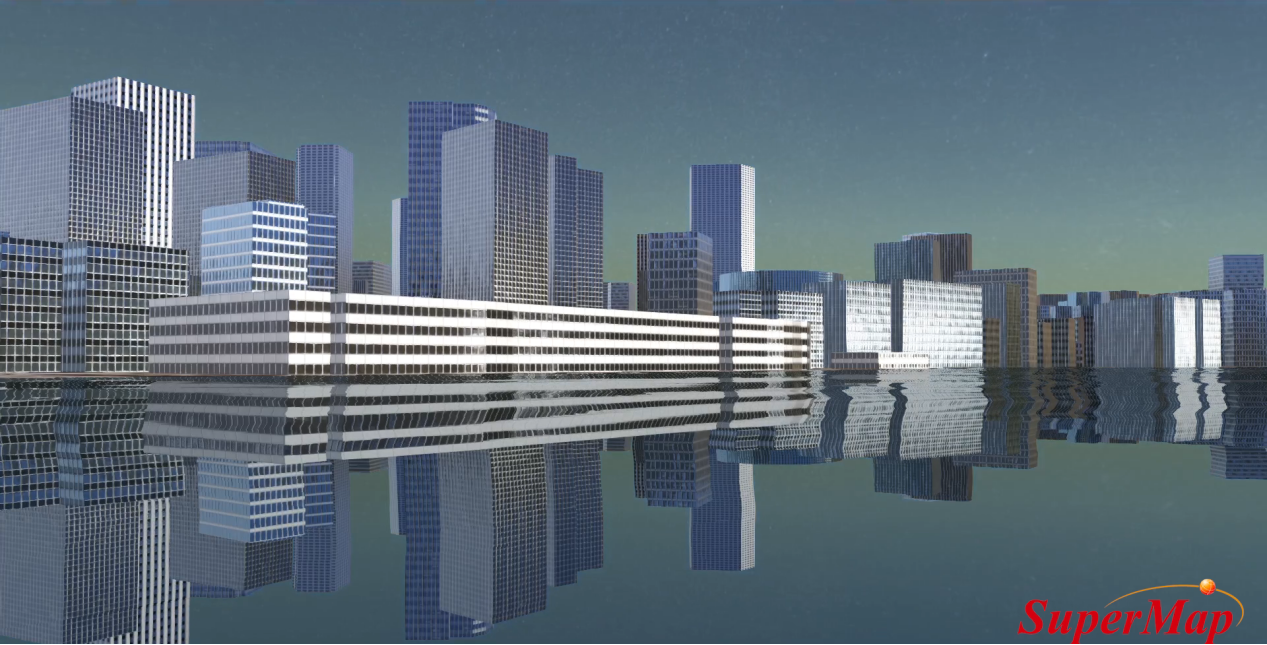
Figure 22
Night scene effect
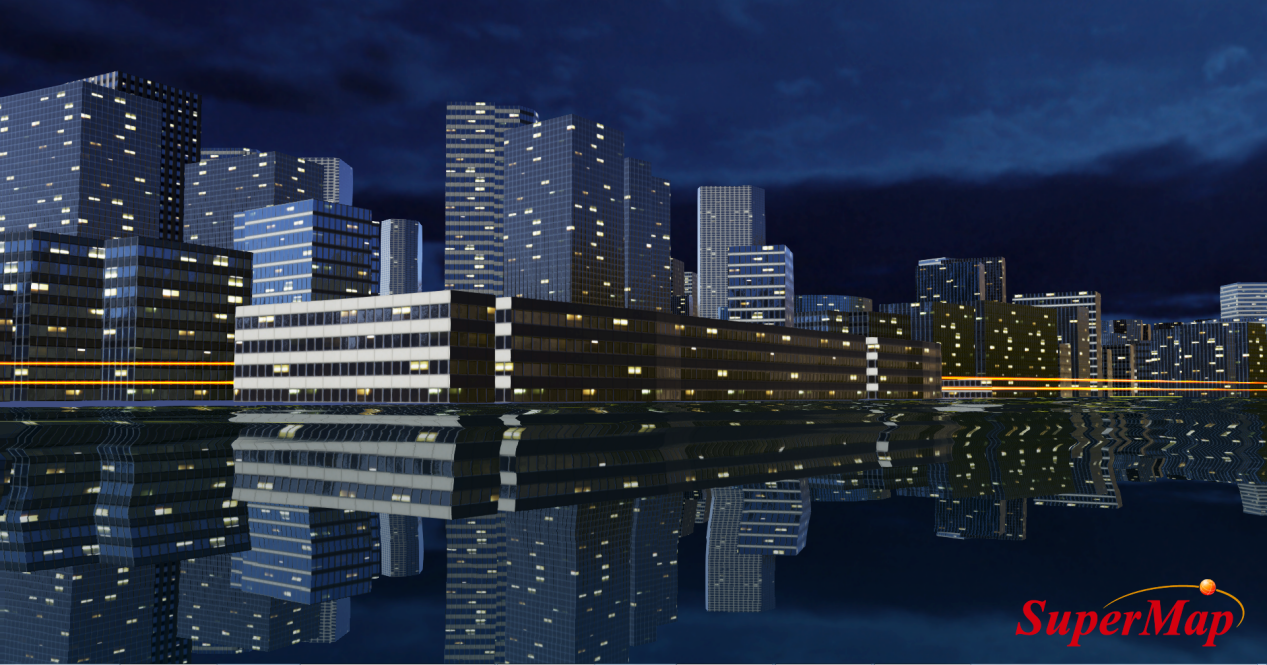
Figure 23
Note:
1. Please use the latest SuperMap iDesktop and client versions on SuperMap official website. Software download link:
- SuperMap iDesktop http://support.supermap.com.cn/product/iDesktop.aspx
- SuperMap iClient3D for WebGL http://support.supermap.com.cn/product/iClient.aspx